
Date & Walnut Loaf – Moist, Delicious & Perfect Fresh or Toasted
Prep Time: 20 minutes
Cook Time: 50 minutes
Additional Time: 30 minutes
Servings: 10 slices
This moist old-fashioned date and walnut loaf is beautiful served fresh with butter or toasted a few days later. It works wonderfully gluten free and can be baked in either a regular loaf tin or traditional old-fashioned roll tins.
Ingredients
Date Mixture
- 175 g chopped dates, about 1 heaped cup
- 60 g butter, softened, 3 tablespoons
- 1 teaspoon bi carb soda
- 250 ml boiling water, 1 cup
Remaining Ingredients
- 115 g walnuts, roughly chopped, about 1 cup
- 150 g brown sugar, about 1 loosely packed cup
- 2 eggs, lightly beaten
- 1 teaspoon vanilla extract
- 300 g plain flour or gluten-free plain flour, 2 cups
- 1 teaspoon baking powder
- ½ teaspoon xanthan gum, for gluten-free version only
- Pinch of salt
- 1 teaspoon ground ginger, mixed spice, cinnamon or nutmeg, or any spice you like or nothing at all
Instructions
Prepare the Date Mixture
- Place the chopped dates, softened butter and bi carb soda into a bowl.
- Pour over the boiling water and stir well. Set aside for 30 minutes so the dates soften and the butter melts.
Prepare the Tins
- Grease a loaf tin well with butter and lightly dust with flour. Alternatively, grease 2 traditional roll tins. You could use spray oil, but I find the butter and flour method always reliable.
- Preheat oven to 190°C conventional (375°F) or 170°C fan-forced.
Make the Batter
- Roughly chop the walnuts.
- Stir the brown sugar, eggs, walnuts and vanilla into the softened date mixture.
- In a separate bowl combine the flour, baking powder, salt and any spice you’re using. For the gluten-free version, also add the xanthan gum.
- Sift the dry ingredients into the date mixture and stir until just combined.
- Spoon the mixture into the prepared tin or tins. If using traditional roll tins, fill them only halfway before placing the lids on, as the loaf rises considerably during baking.
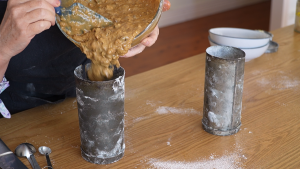
- For the gluten-free version, allow the batter to rest for 5–10 minutes before baking.
Bake
- Traditional roll tins: approximately 30 minutes.Fill the tin only about halfway, then place the lid on before baking. Start checking the loaf after about 30 minutes, as these tins often bake a little faster than a standard loaf tin.
- Loaf tin: approximately 45–50 minutes
- If the loaf is browning too quickly before the centre is cooked, loosely cover the top with baking paper or foil.
- The loaf is ready when a skewer inserted into the centre comes out clean.
- Leave the loaf in the tin for 10 minutes before turning out onto a wire rack.
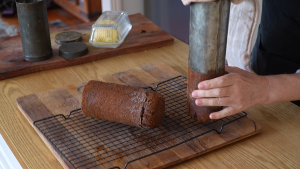
To Serve
- Slice thickly and serve generously buttered. Delicious fresh or toasted over the following days.